Showing posts with label Lyrical Letters. Show all posts

Monday, October 3, 2011

Disney Layouts - Part 6 - The Last Part of the Disney Album

Hello everyone!  My Sunday got complicated yesterday, so I wasn't able to post.  Today, I decided to finish off DISNEY WEEK and show you the rest of the layouts in the Disney Album.  So this will be a very long and PIC HEAVY post!!!  But I think it will be worth it, so keep reading! 
If this is your first time here at my blog, be sure to check out the other Disney Layouts by either reading the older posts below or click the Disney label on the right side (or you can simply click HERE and see all of the Disney layouts).  I would love to know if you've enjoyed this themed week of layouts, so be sure to comment and let me know you were here and what your favorite layout(s) was!

Let's start with this first one, which is all made with the Mickey Font cartridge (a must-have and one that I use probably most often for fonts).  I love the font, but it also has all of the basic characters and some other neat features like the tag, ticket, and license plate.  Here it is with closeups...


Here are two single page layouts, one for each ride in Magic Kingdom.  The first one includes the merry-go-round cut from the Carousel cartridge.  The title is from Baby Steps and Cuttin Up, which are glittered. 


I can't remember a lot of the details from the layout below, but the title is from Mickey Font.


I really love this layout below because I was able to take the idea in my head and create it in my gypsy.  I wanted it western and with a rope, so I found Howdy pre made on Create a Critter and the badge.  I then replicated the look to create "Partner" using Lyrical Letters cartridge.  Now the border was quite a find!  It is from Stretch Your Imagination under the Card Frame feature.  It cuts in a square, but I cut it to create the continuous border across both pages.  The characters are from a sticker sheet, which I put on card stock and then cut around and popped (of course, lol!).


I also added some lines to make the title look like rope, see here:


This layout is scrap lifted, but I don't remember from where and the file is on my stolen computer :(


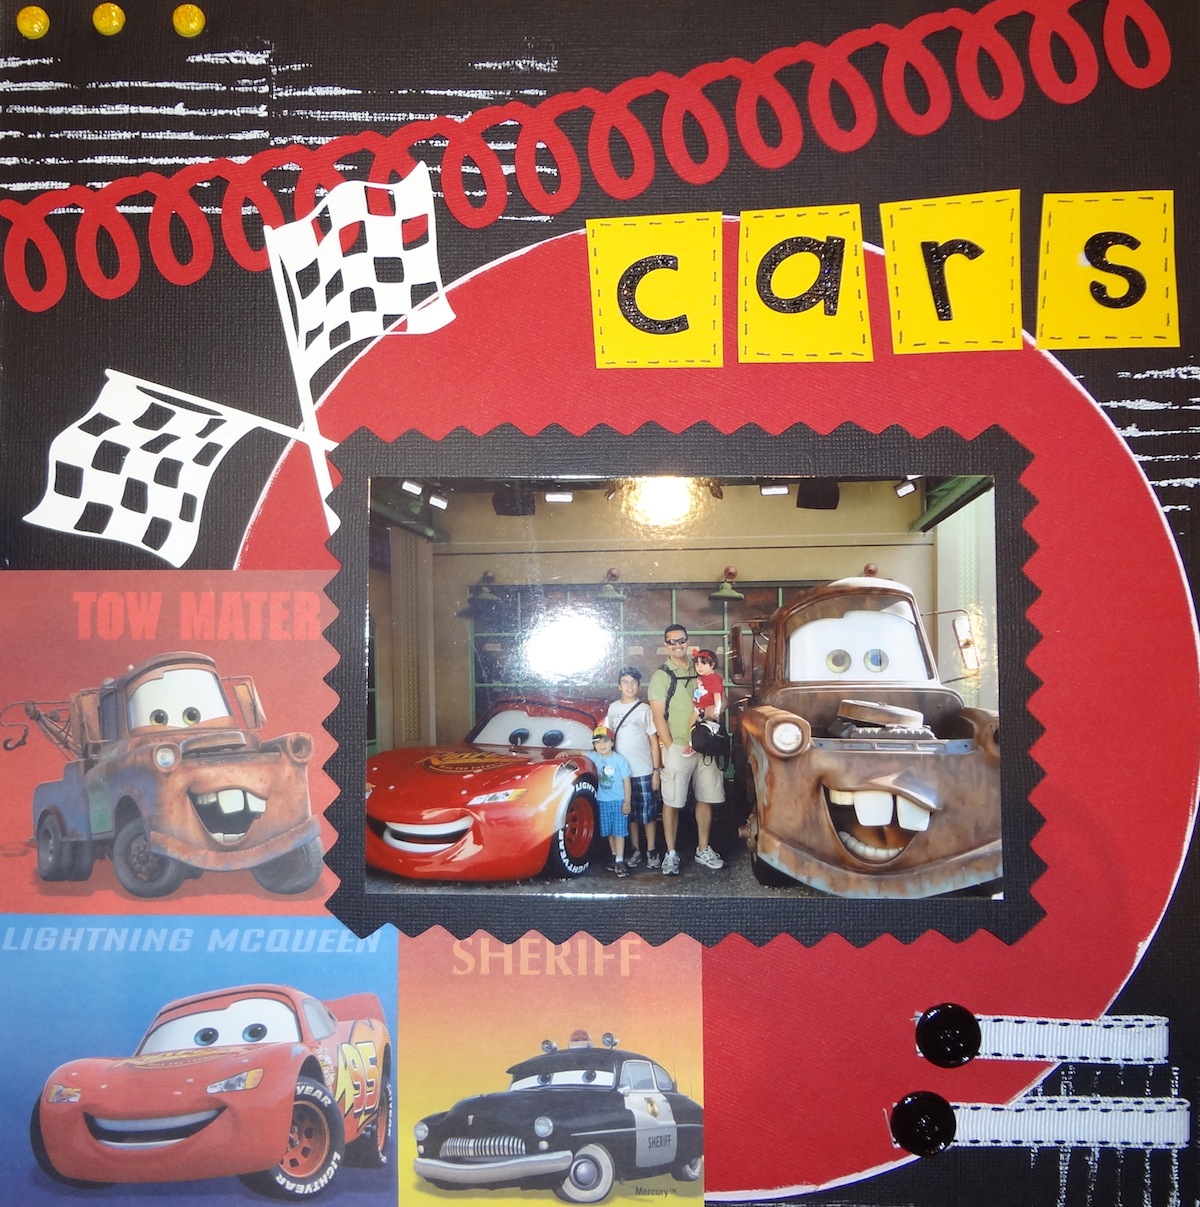
This layout is also a cool one, I think.  I distressed it some with some rippled cardboard and white paint.  "Start your Engines" is from the Cars cartridge, as are the flags.  I created the title by creating irregular squares (which I doodled around) and placing the letters (from Cuttin' Up) in each one.  I made the large, red loop border by welding a ton of cursive l's!  Here is the layout with a close up of each page...


This is the last page of the album, like a hodge podge of left over pictures.  I had this great sticker sheet with a ton of banners and I wanted to use all of it, so I did as my left side border of the page.  The top corner is a felt pre made border, which I cut to create the corner effect.  


For the trip, I had created an Autograph Album for my kiddos with my Bind-It-All machine which they used throughout the trip.  I wanted to put it in the album in a way that you could flip through it to see all of the autographs.  I decided to create this on the inside of the back cover of the album.  I used this pattern paper with all of the signatures (how appropriate, huh!) and then placed the autograph album on top.  


Wow, that was a really long post!  I hope you've enjoyed DISNEY WEEK here at ScrapSticklePop.  If you've enjoyed it, please be sure to leave me a comment below and let me know what your favorite layout(s) was.  You can also post or pass along a link to my blog to your other bloggy friends who might like to see it!

I'm also entering some of these layouts in the following challenges:
Crafty Chics - Disney Pixar Link Up Party
Whimsical Wednesdays - Anything Goes
Passionately Artistic - Linking Party
You Had Me at Craft - Linking Party


Thanks for stopping by!
Be sure to stop by tomorrow as I get into the Halloween spirit!

Monday, August 1, 2011

Look Whoo's Walking Layout

Hello everyone!  As I continue to try to finish my daughter's first year, volume 2 scrapbook, here's another layout of an important milestone - learning to walk!  I had this adorable paper with the cutest owls ever and I wanted to use it so I made sure my title brought this all together.  The title is from Lyrical Letters and A Child's Year.  The footprints are from New Arrival.  I love the fun colors and how it all came together.  Take a look...


Thanks for stopping by!
I hope to finish a layout tonight to share tomorrow, so be sure to stop by then!

Sunday, July 3, 2011

The Keys Layouts

Hello everyone.  Had some new paper from Best Creations that were inspiring so I browsed my thousands of pictures for vacations that I hadn't scrapped yet and found pics from our Keys trip last year that would work with the papers.  Now the same thing happened to me for both layouts that I'm sharing today.  There was this one really great paper that was easy to work with, just add pics, a title and it was good.  Problem is, I wanted to make them 2 page layouts and then I had to come up with the side page from scratch to coordinate, which is really time consuming.  So they took me a while (much longer than I wanted, but that's how it goes), but I love the end result.  And that's another thing I love about scrapbooking, once you've completed a layout, you have this sense of accomplishment, a memory saved.  I don't know about you all, but I find myself staring at my layouts again and again with a smile on my face.

So let me talk a little about each layout.  First of all, if you know me or follow my blog, you'll know that I like putting a lot of pictures on my layouts (because I take a ton of pictures and like to have them on my pages, but don't necessarily want to create a ton of layouts for the same topic).  So you'll see lots of pictures on each layout.


I like using punches and I especially like the new EK punches (the ones that pack up tight and don't take up a lot of space), which I used to create the top border on the right page of the Keys layout.  Now for the bottom, I had cut a semicircle from the patterned paper, but wanted to add a border to it, so I did using a circle punch and tucking the circles behind the patterned paper to create the scallop paper.  I also ended up adding brads to add more interest, as well.  Now, I try to always journal because telling the story is super important to me, but on this layout, I didn't have much space, so I created the little journal tags and tucked them in.


This second layout was first inspired by the great paper on the left.  I had a focal point photo and tons of others, so I decided to print them small and then I loved the look of this photo block on this paper.  Problem was, I had more photos to add about us on the boat and it took me forever to figure out what to do with the right page.  Of course, now that it's done, its my favorite page, lol!  


 would

I had a scrap of this dot blue paper on my table and it work, but I wasn't sure what I was going to put it on.  I decided to use different shades of blues.  I again went to my punches and created the scallop border for the top and bottom.  The left page has words all over it, so I need words on this page to balance it out.  I decided to create a mixed font title (which I love to do because I love that look). 


 I used a variety of fonts and moved them all of the mat on my gypsy so I could cut out the different colors all at once.  I used Baby Steps (such a cute font, have I mentioned how much I'm loving this cartridge), Mickey Font, Lyrical Letters and Wall Decor & More.   Of course, it's all stickled and "Boat" is popped!


At this point, it was coming together, but I needed something at the top.  So I took a cue from the postcard signage and writing on the patterned paper on the left and decided to create it myself on this page.  I punched circles in a bunch of sizes and dusted off these circle stamps I own that I haven't used in forever.  I created the postcard/mail processed lines with my flexi ruler, a pen and stickles.  


Wow, that was a long post, whew!  Sorry, just decided to let you in on my process (and like I said, with these layouts, it was a long one!).  I hope you've enjoyed the layouts.  As always, Thanks for stopping by!

Tuesday, December 28, 2010

Vinyl Crazy!

Hello everyone!  I hope you all had a very Merry Christmas!!  Now that all presents have been given, I can show you all some of the projects I created with vinyl!  I hadn't really used it before this month and I must say, I'm in love!  Now, I just need to get more color selection!  I'm leaving on vacation now, so this has to be a super fast post (my husband is calling me, yikes!)

So here they are...enjoy the pics!!


I will share the poem more closer up on the next post, but for now I've got to go!

Have a happy new year everyone!


Tuesday, July 20, 2010

Christmas in July


Fantabulous Cricut has a Christmas in July challenge this week and ironically, those are the layouts I've been finishing up! A couple are from long ago, classes that I taught, but I just got around to adding the pictures. I guess it's only fitting that after all the the Thanksgiving layouts I finished, to move on to the next holiday. So here are a bunch of my Christmas '09 layouts (LOTS of pictures to follow!)...Enjoy!


My ultimate favorite Christmas Layout is this one:
It is all done using the Christmas Cheer Cartridge, which is now retiring, I think. What a shame if you don't have it, because it is my favorite for Christmas images! Here are close ups of the details of this layout...

Love, love, love the reindeer on this cartridge!


I love my gypsy, just LOVE IT, and layouts like this one are one of the reason why. I was able to combine 5 different fonts to create the title, but the most beautiful part, was that the words are each welded!

Fonts used here include Lyrical Letters, Sesame Street Font, Gypsy Font, Christmas Cheer.


My gypsy at work here again. I wanted a tall Christmas tree to fill the space on the right so I could put "faux" ornaments (brads) on the tree.
I found a tree I liked and stretched it using my Gypsy and voila


This layout is all done with the George Cartridge!! I use it all the time, especially to teach beginner's cricut classes, so I push myself to think outside the box time and time again, everytime I teach the class, to change it up. This one is fun because it takes basic shapes to a whole different level!


This layout was about my grandma, 100 then, now 101. I loved the pink and green combo of colors - Christmas doesn't always have to be red!
Another mixed font title (I love this look, can't you tell!). The snowflake and "Bisa" are sprinkled with Martha Stewart Tinsel glitter. I also used a combo of pearls on select letters, and bling on the snowflakes.
This one I added a fabric brad to the center.

This last one is from our trip to Stone Mountain where we went tubing and the kids played in the snow for the first time.


Related Posts with Thumbnails