Showing posts with label Crafts. Show all posts

Thursday, February 23, 2012

Silhouette Cameo Projects - I love you frame & Pregnancy Card

Hello everyone!  I did a little crafting tonight (yay!!) and I wanted to share my two little projects.  I'm really getting the hang of my Silhouette Cameo and (trying not to jinx it) really liking it!  It's particular convenient  because I have it set up on my scrap table (doesn't take up much room) next to my laptop and when I get an idea, like I did tonight, I just open up the Silhouette Design window and start playing.

My first project was from an idea I saw on Pinterest last week.  Someone had created an "I love you because..." frame that can be used to leave notes with a dry erase marker.  So I found a frame, customized the inside and made one for myself!  One of my favorite features of the Cameo is that welding is easy - you simply type your words, adjust "character spacing" using the toggle button, which brings the letters together and then click weld and its done.  But even better than that is that you can then SHADOW ANY WORD by clicking ONE button and then using the toggle switch to make it a thinner or thicker shadow.  I really was able to make this frame in about 10 minutes.  I'm also able to cut very skinny fonts without the paper tearing, another huge plus.  Here is the frame...


Here it is with the message I left for my hubby to find when he gets home from work tonight...


My next project was a card for a friend who just told me today she's pregnant.  I wanted to make her something special and I had this idea in my head, so I went to the Sihouette online store and looked for some images I could possibly use.  When I saw this pregnant girl, I knew that was it.  So I picked the image and clicked shadow.  With my shadow active, I then clicked on the "mirror left" button, since I wanted to make a shaped card.  I moved them a bit closer together and welded them.  I also wanted a heart in the space on the belly to write a little sentiment, so I added that as well.  I moved the girl to one side and the card base on the other because I cut them out together (I put the pink paper on the left and the brown paper on the right).  Below is a screenshot of it...


Here is the final product...


I'm all about making use of scraps, so I created another card using the negative space leftover from my card to make this one...

Would love to hear from you, so be sure to leave a comment below!
Thanks for stopping by!

Monday, February 13, 2012

Valentine's Layout, Centerpieces and Valentine's Box, oh my!

Hello everyone!  Wanted to kick off the Valentine's holiday by sharing a bunch of projects I've been working on - some on my own, others with students or with my own kids.  Warning:  this is a pic heavy post!!

First, I wanted to share a Valentine's layout that I scrap lifted.  I saw it at a local scrapbook store, the Paper Niche, and I loved it!  So I bought the fun Bo Bunny papers and recreated it, modifying it a bit.  I love the bright colors, polka dots and flowers.  Here it is...


Here is a close up of the ribbon strip...


Can't wait to add the pictures!  

Now, with one of the clubs I sponsor at school, we are putting together a teacher breakfast tomorrow.  For centerpieces, I decided to create paper owls with the kids.  We made them on both sides.  Look how cute they came out!


The students wrote sayings about teachers and we added them on popsicle sticks behind the wings as if the owls were holding them up.  Here is what the set up looks like for the breakfast...


Finally, tonight my son and I worked on his Valentine's project which was making a valentine's box along with cards for all of his classmates.  I wrapped a shoebox and he used my gypsy to cut out different words and images he liked.  I love that he picked them, spelled Valentine's and cut it out by himself.  To make it a bit more personal, we put his handprint on his box.  We also decided to make a ribbon handle for him to carry it to school.  Here are some pictures of the process...


 I'd love to hear your comments, so be sure to leave one and let me know you stopped by my blog!
Thank you for stopping by today!

Sunday, February 5, 2012

Tray & Baby Mini Book

Hello Blogger Friends!  I'm back from my trip, Super Bowl has just ended, and I wanted to get back to posting!  So today, I'm sharing some of the projects I made as Christmas presents.  The first project is a tray I made for my sister.  She has a new house in the Keys and I wanted to bring in that color scheme.  It has a bit of glare, but that is because it has the acrylic liner on top.


For one of my best friends, I made a baby brag book for her with pictures of her beautiful baby girl.  Here it is...


Hope you liked today's post.
Wait, almost forgot to share some fun news, my entry for the DCWV January Sketch Challenge made the Top 10!  Woohoo!  
I'll be back tomorrow with more to share.  
Hope you have a great start to your week!

Thursday, February 2, 2012

Birthday Crown and Cake Pops!

Hello again, blogger friends!  Please join in me in wishing my little boy a HAPPY 6TH BIRTHDAY!!  When he wakes up tomorrow, I have a crown that I scrapped today ready for him to wear all day.  I picked up two from Burger King and then personalized them.  I used my Cameo and I got it done in like 15 minutes - it was great!  Here, take a look...


Tonight the kids and I made our first ever Cake Pops!  I bought a Cake Pop maker about two weeks ago and have been waiting to try it out.  I used cake mix and let the kids stir it all up.  Then I filled the openings with the mix, closed the lid and in 8 minutes the first batch of 7 were done.  As they cooled, I inserted the sticks (which I dipped in frosting first to make them stick) and when they cooled completely, we dipped them and added sprinkles.  So they are ready to share tomorrow after the big "Happy Birthday"!  Now I will virtually share them with you...

The birthday celebration begins in the morning and continues through the weekend!
I hope you've enjoyed today's post, thanks for stopping by!

Monday, October 31, 2011

Halloween Treats - Boo Pencils

Hello everyone - Happy Halloween!  Tonight, my kiddos and I put together the treats to send to their classes tomorrow.  My son this year is in Kindergarten and there's many more students in his class than there were last year in his PreK class, so I had to go more cost effective, which is why I decided to send in pencils (either way, I know that they will be getting plenty of candy, so I wanted something else).

My very creative son thought up the idea of putting a googlie eye on the pencil (like it's looking at you), which I thought was so cute.  Totally on his own, he found the googlie eyes, found the glue dots (I just love that he knew the perfect adhesive to use and where to find it, lol!) and got to work.  After, I wanted to put a little something more on the pencil, especially to add in a message and his name.  So we thought of a ghost and I found the perfect one on Mini Monsters.  I punched a whole in one of the eyes and put the pencil through it all the way to where the googlie eye was.  I just love the way they turned out!

Now my sister gave me a great idea as to how to take them to school.  I created a little graveyard scene in a tin box with foam inside to stick the pencils inside so they would stay.  I of course had to decorate that with my cricut!  Again, I used Mini Monsters and I also used Stamped for the "happy".  Take a look at this....


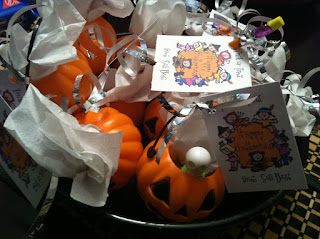
For Sofi, I had found these cute little stamps and bubbles, which she placed in the little pumpkin containers for each of her friends.  I then made little tags to add to them and my sister added some tissue paper and ribbon.  They are all set for her to hand out tomorrow.


I'm entering these in the following challenges:
Fantabulous Cricut - Spooky (how appropriate for my pencils!)
Passionately Artistic Linking Party
More than Favors - Anything Goes

I hope all of you have a 
Happy Halloween!
I'll be sure to post some pics of our costumes tomorrow!
Till next time, thanks for stopping by!

Wednesday, August 24, 2011

Back to School Again and Twinkle Toes

Hello everyone!  I've been away on vacation and now I'm back to school as our new school year started this week, so my life will become even more hectic (again!).  Both my kiddos had milestone first days of school and I welcomed a new set of 8th graders.  But with all that good news, I'm also dealing with an upsetting situation as my house was burglarized this week and they took my Macbook and my iPad, among other things, and it's really hindered my life in lots of ways.  With all this in mind, my posting here on my blog has and will surely slow down.  But I'm going to try to keep posting, my goal is to try 3 times a week, but we'll see how things go!  Thank you to all who have left comments on my previous posts, they make me smile and let me know that there are people out there reading this thing! LOL!

So today I have a quick post of some back to school little crafts I made for my sister and friend.  I saw this idea in a magazine and I wanted to try it.  So I found some cute graphics to go along with each person's theme/personality and I created a header on Word.  I then made tons of copies, cut them and created personalized notepads.  I used chipboard for the back and I covered it with patterned paper and some embellishments.  Look how cute they came out...


I also had to personalize and scrap my planner for this year...


Finally, I took my daughter to her first ever dance class as a trial.  She didn't have any dance clothes so I decided to make her a shirt and bow to wear for her first class.  Here is what I created...


Of course she had to also have a bow to match, so I made this one...


OMG, I just realized that I lost those pictures, too, with the rest of my over 700 pictures from my summer.  How sad, I can't even scrap them.  I'm so mad ><

Anyways, my birthday is this weekend and I hope things turn around for me (if the hurricane heading in our direction doesn't ruin it)!  Here's hoping for sunny days ahead!

I hope I'm able to scrap this weekend and have something to share, so be sure to check back!
Thanks for stopping by!


Tuesday, February 15, 2011

Buzz Lightyear Party - Part 1

Hello everyone!  Not a lot of time today to post, but wanted to share a couple of the things I made for my son's birthday party this weekend.  I haven't even had a moment to upload all the pics, but hope to this week so I can share some other things, especially the AMAZING cake that my friend Marylin brought to the party.  I kept it simple for this party, it was at a park and I wanted a sign for the entrance.  So my husband brought me an outdoor sign which I covered with blue poster board and then I created the "Welcome Space Rangers..." sign for the entrance to our pavilion.  To make the green letters pop, I stitched them with my white pen.  I used Mickey Font (a definite fave!) and Accent Essentials for the starburst under the 5th.  Here it is...


So excited to share this, my very talented nephew drew this from scratch!  I wanted to create a game for the party and my nephew came up with this idea to draw Zerg (the nemesis of Buzz Lightyear) and then have the kids shoot at him (like the Buzz Lightyear ride at Disney).  He did such an impressive job on this!  We then found a target clip art that worked perfectly, which we popped onto Zerg.  Isn't this great?!


I realized after I sent the invitations that I hadn't indicated which pavilion we were in, so I made another sign, although not as cute as the welcome sign, to place in front of the park for people to see when they got to the park to know where to go...


If you didn't get a chance to see the invites I made for the party, you can check them out (as well as a little gypsy tutorial on how I made them) HERE.

Oh, I almost forgot, I made the Chirp again, with my Tiny Dancer layout - it's the featured picture!  Woohoo!  You can check the newsletter HERE and you can check out my blog post with closeups of my Tiny Dancer HERE.

I hope to be able to upload more pictures tomorrow so I can share more pics of the party.  I hope you come back by to check them out.  
Thanks for stopping by!

Related Posts with Thumbnails