Tuesday, August 31, 2010

More Beach & Splash Layouts

I recently became a member of My Creative Scrapbook Kit Club and the July kit was full of some really fun summer paper and embellishments.  Since we did a lot of beach and pool fun this summer, it went perfectly with so many of our pics, so I decided to bring out the kit and use it up.  This is going to be the album opening page for our vacation...


This is another layout using the same paper line, although I had done this class with this paper line way before I got my kit using lots of Cricut (how strange, I know, LOL!) including Create a Critter, George, and Life's a Beach....  The beauty is that it all coordinates!  


Here is a close up of the left page...


and the right page...


And here are some of the cuts...


Sunday, August 29, 2010

Seashore Layout

I was excited to make this layout because I had sketched it out in my gypsy during our trip and it came together just how I had imagined.  I knew I wanted a collage of pics on the right page and a focal point photo on the left page.  It is using a whole bunch of cartridges and lots of embossing (I do love my cuttlebug!).  At the Fantabulous Cricut blog they are having a tropical theme challenge this week so I think this fits right in.

Here is a close up of the left page...

And here's the right page...

Lots of embossing, sanding and inking on my title..


I was excited to use my Summer Vacation solutions cartridge...


Saturday, August 28, 2010

If the Crown Fits Layout

This past month I taught a Cricut class exploring the Once Upon a Princess cartridge.  This cartridge is so super duper cute!  Besides the adorable dolls and outfits, it has tons of phrases and other icons.  I had fun making this layout for pictures of my little girl which I will be adding soon, but I wanted to share the layout.  It has a lot of layering and although it doesn't look like it, it took quite a bit of time - but all worth it because its all about the details!  Of course, it's all stickled and popped...that's my motto!


Wednesday, August 25, 2010

Easter Layout

This week is officially Back to School week and now, my life gets even MORE BUSY and hectic.
But I really want to try hard and keep up my blog...so bear with me!
As a matter of fact, I've been working on a bunch of summer/beach layouts and I can't wait to share, but maybe this weekend I can get those posted.  

For now, wanted to do a quick post...

I made this for a class some months back, but now I finally got around to adding pictures.
This is one of my Easter Layouts - focusing on "The Hunt" which this year was at my house.
This is all using Doodlecharms (an oldie, but a goodie!)...
BTW, you can always click on the picture to enlarge it and see the details!


My favorite part, besides the scalloped heart (which is my absolute favorite cut on that cartridge!), is the embossed easter basket full of eggs, take a closer look...


Thanks for stopping by and feel free to leave a comment (and show me some love!)...
Have a great end of the week!

Sunday, August 22, 2010

Teacher Clipboard

Just finished a quick project for my classroom.  Getting last minute things ready for tomorrow and I remembered I needed a clipboard for something in my class, so of course, I scrapped it!


Also, I made a quick card for a birthday party this morning, nothing special, I really don't make cards, but I'll post a pic anyways...

Have a great start of the week everybody...it's back to school for me!

Saturday, August 21, 2010

Splash Mini Book

Here's a cute mini book that I think I'm going to add this summer's highlights in pictures to at some point this week.  It's from last year's BoBunny paper (I think) and has a little bling, a little pop and a lot of space for pics.  Here it is in it's entirety....


Baby Frame

I teach classes at My Paper Tree House in Miami and this Baby Frame was one of my classes this week.  I'm going to give this to a friend of mine who is due in October...I know she's going to love it!
Here are some close ups...
everything is stickled and popped (just my style, my blog is called scrapsticklepop for a reason!)

I included a little card to either right a message or to use for recording baby stats.

 Using my favorite Peachy Keen stamps!

Here is the girl version of my class, almost complete, by one of my students and dear friends, Lissette.

Thursday, August 19, 2010

I Made the Chirp! & Boy Layout

I got some great news today that I made the Chirp this week (Cricut Newsletter for my non-scrapbooking friends) for my Summertime BBQ layout.  How exciting!  I didn't even know I had, since I hadn't read my newsletter, yet, but a great friend of mine told me (thanks Lisette) - so I checked my email newsletter and there I was :)  You can see it and some other great projects featured here on the Chirp link.

 I wanted to post a quick layout that I just finished featuring my favorite boy.  It is all done using Graphically Speaking.  There's a lot on that cartridge, most people don't even realize!  So I wanted to feature a great picture of my cute boy and journal about him now at age 4...


One of my favorite things are the number strips that it cuts out.

I also have a super cute baby frame that I taught in a class tonight that I will be posting a little later this week, so be sure to check back!

Tuesday, August 17, 2010

More School Theme - Pencils & Mickey Wreath

I'm excited that I made TOP 3 at Sketches in Thyme for my Love Birds layout that I made last week!  They have another great sketch this week, just not sure if I'll have enough time to make one with going back to work, but we'll see.  

In continuing with my "Back to School" theme, I have to share two super cute projects I've been working on.  The first is a total scraplift from CK magazine (Sept - pg. 68) to create pencil made from candy and cardstock, basically.  I made one for my son to give his teacher the first day of school and another to give as a sweet gift.  It is a roll of "Rolos" candies and a hershey's kiss.  The "Rolos" are covered with a piece of yellow cardstock (scored every 1/4 inch) and one end is cut with a pinking edge scissor.  The eraser is created using pink cardstock (I created a circle on my gypsy to fit the size) and  a small piece of aluminum foil.  I then made a star and personalized them myself.  I think they are the cutest thing!  


The next project I'm most excited about because I had envisioned this in my head, but when I started making it, I ran into a couple glitches, but I finally made it work and I love the way it came out.  As my last post showed, I love making teacher wreaths, I've even taught a class on them.  Well, I wanted to make one for my principal, who happens to love Mickey (her entire office is full of them!).  So I got this great idea combine both ideas AND to take it a step further, since we are the Wizards, I decided to also add a hat (think sorcerer Mickey).  Now, my wreath is up on my door all year long because I put magnets on the back.  I wanted to do the same for hers, but with the extra weight, it was extra hard, but I finally made it work with a combination of magnet strips and a magnet sheet.  Here is the final product...


A couple close ups...

I used a bunch of different cartridges including Locker Talk, Sesame Street Font, Makin the Grade, Mickey Font & George

I freehanded the wizard hat

Here is a photo of it on my fridge (testing out to see if it holds and it does, hooray!)


I'm so excited to give this to her because I know she's going to love it and it will also match her office.
Let me know what you think - I love reading comments!  Have a great day everybody!

Saturday, August 14, 2010

Back to School Projects

I started going back to work early this week (although teacher's aren't due to report until next week) to start getting things ready.  Late last night, I was working on a couple projects that I wanted to share.  First, at the end of last year, I put the camera on timer and got a fantastic picture of our entire staff and I wanted to make a frame to give to my principal.  We are known as the Wizards and our motto is "We Create Magic" so it was perfectly fitting for the frame and the pic.  The title is cut from Sesame Street Font (love that font!) and the swirls are from Home Decor.  Of course, now I have to make another one for me, because I love it and want to display it in my own classroom.  That's the thing about when I make things for other people, I end up having to make more, esp. one for me!
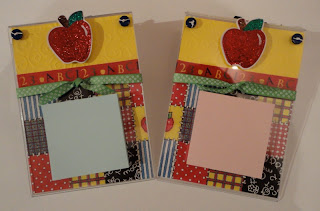
I also began making some note holders, which I've made in the past but I wanted one for my desk and the other is a gift (will probably end up making a couple more this weekend).  I love making these!  They are super easy to do, but look so cute when completed and can be adapted to any theme.  It is a 5x7 acrylic frame turned a different direction.  You choose papers that coordinate the person they are for and slip into the frame.  Then add a die cut to the top of the frame with pop dots.  I also added buttons on these.  Tie a ribbon (to add dimension and to keep paper from slipping out, but you can slip the ribbon off the bottom if you wanted to change out the paper if you like).  The add a post it note pad onto the top that can be replaced when it runs out and voila!
This is the back view so you can see how it is inclined and works great as a post it note holder.
On the back, the part that faces the person on the other side of the desk, add a coordinating piece of paper (I adhere this to the outside so as not to have an issue about hiding adhesive) and the word "notes" (popped, of course! LOL).  I used Mickey Font (welded on my Gypsy) and shadowed it as well on these.
I had made some for teacher appreciation week which I sent to my son's teacher and my sister, the teacher.  These are slightly different, but same idea...the possibilities are endless on this one!


Since I made this post all about Back to School, I decided to also show some pictures of other projects I've made/classes that I've taught.  One in particular that I love is the wreath that hangs on my door all year long.  I've also made these for my son's teachers and of course, one for my sister!

Most all cuts are from the Locker Talk cartridge.  
Since I teach Middle School, I included that cut on my wreath...

This one was for my son's teacher...

This one I made for my sister, who loves bees and that is her class theme, so I added a bee on hers...

The last project I'm going to post was a frame I made for my son's teacher.  The paper is from the DCWV Grade School stack (which is awesome!) and I added a cut from A Child's Year of a boy reading to place under the tree.  
The title is from Makin' the Grade.

I know it was a long post, but I figured, now that I have a blog, might as well keep it all here (categorized - if you know me, that's a must!).  I love comments, so feel free to leave one if you'd like!
Related Posts with Thumbnails