Monday, October 31, 2011

Halloween Treats - Boo Pencils

Hello everyone - Happy Halloween!  Tonight, my kiddos and I put together the treats to send to their classes tomorrow.  My son this year is in Kindergarten and there's many more students in his class than there were last year in his PreK class, so I had to go more cost effective, which is why I decided to send in pencils (either way, I know that they will be getting plenty of candy, so I wanted something else).

My very creative son thought up the idea of putting a googlie eye on the pencil (like it's looking at you), which I thought was so cute.  Totally on his own, he found the googlie eyes, found the glue dots (I just love that he knew the perfect adhesive to use and where to find it, lol!) and got to work.  After, I wanted to put a little something more on the pencil, especially to add in a message and his name.  So we thought of a ghost and I found the perfect one on Mini Monsters.  I punched a whole in one of the eyes and put the pencil through it all the way to where the googlie eye was.  I just love the way they turned out!

Now my sister gave me a great idea as to how to take them to school.  I created a little graveyard scene in a tin box with foam inside to stick the pencils inside so they would stay.  I of course had to decorate that with my cricut!  Again, I used Mini Monsters and I also used Stamped for the "happy".  Take a look at this....


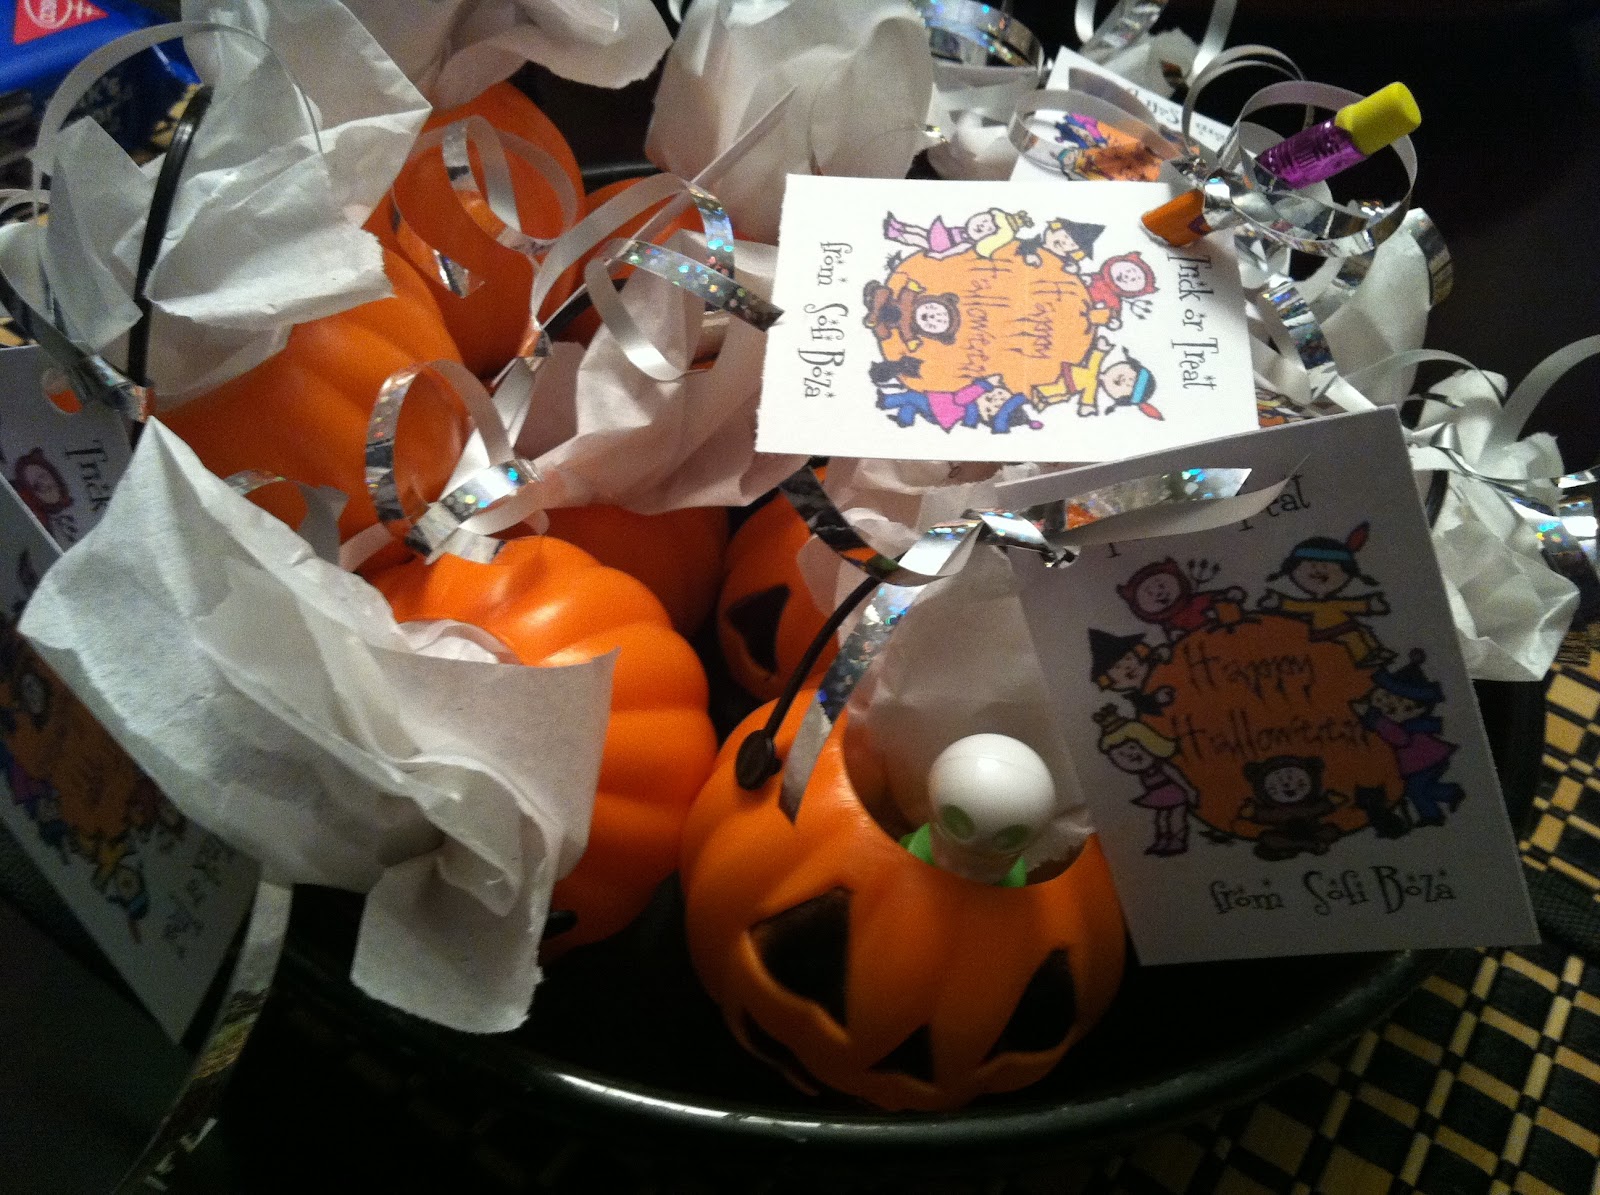
For Sofi, I had found these cute little stamps and bubbles, which she placed in the little pumpkin containers for each of her friends.  I then made little tags to add to them and my sister added some tissue paper and ribbon.  They are all set for her to hand out tomorrow.


I'm entering these in the following challenges:
Fantabulous Cricut - Spooky (how appropriate for my pencils!)
Passionately Artistic Linking Party
More than Favors - Anything Goes

I hope all of you have a 
Happy Halloween!
I'll be sure to post some pics of our costumes tomorrow!
Till next time, thanks for stopping by!

Tuesday, October 18, 2011

Twinkle Toes Layout

Hello everyone!  Back and ready to show you a super cute layout of my little dancer.  Funny enough, this layout started out because Frosted Designs had a really fun "recipe" challenge last week.  Unfortunately, in my busy schedule, I forgot the deadline and missed it.  But I was glad for the inspiration.  You needed to use at least 4 of these items:
1. The color yellow
2. Ribbon or lace
3. Chipboard
4. Flowers
5. Misting or inks
6. Buttons
7. Stickers
8. Rub ons

The yellow was really what kicked everything off, because I instantly  thought of my daughter's ballet outfit and I needed to scrap her first dance class, so it was perfect.  I went to Sassy Lil' Sketches for some more inspiration and I found a layout that worked for the right side of my layout.  The rest came together pretty easily.  I found this striped paper that I've had for a while, but it was bright and girly and just what I wanted to make the pictures and cutout pop.  I knew I was going to use the Twinkle Toes cartridge and I decided to use that phrase as part of the title.  I also wanted to include that it was her first dance class, so I went to my chipboard letter stash and found the perfect pink ones that complimented the layout well.  I hand wrote the "1st" and "class".  I added flowers and buttons and ribbon, too.  So I ended up using 5 of the supplies on the list.  I must say, it was a fun challenge incorporating all of these things!  
Here's the layout and all of the details...


I had this little chipboard saying in my stash and it worked great next to my little dancer cutout.


But I have to show you guys the best part of the whole thing, my daughter was up at 2am scrapping with me!  Just like at her, you wouldn't think it was 2am, more like 2pm, but I guess, like mother, like daughter!  


I'm linking this up to:


 and 
ScrapFit for a bright and bold layout.

Thanks for stopping by!
Come back soon!

Friday, October 14, 2011

So Stinkin' Cute

Hello everyone!  I'll be away for the weekend, but wanted to leave a quick post of my cute girl and best friend.  This paper I used on the layout was the inspiration, because of the cute critter it had on it.  The title helped me bring the critter and my cutie together.  I love these pics of her and my bf while playing with her iPhone.  She is just too much!  The title is from All Mixed Up.  I then used enamel for the critter and the swirls to make them pop.


I have another super cute layout to share with you all on Monday!
Be sure to stop by then!
Have a great weekend everyone!

Thanks for stopping by!

Tuesday, October 11, 2011

Baby Girl Card - Tutorial w/ Gypsy & Embossing Tip

Hello everyone!  There is a baby card challenge over at Cricut 360 this week that inspired me to create a card, since I have an upcoming baby shower for a friend.  In doing so, I decided to photograph the process and make this a little tutorial, too!  First off, here is the card I created:


 I love my gypsy, for so many reasons (maybe a future post?!), but it really makes things quicker and simpler.  Here, I'll show you...

For my card, I knew that I wanted to use my Baby Steps cartridge (because I LOVE it!).  But the image I wanted to use required at least 6 different colors to make it look the way I wanted.  Someone seeing that, might just abandon that cut right then and there, especially if they're looking to make a quick card.  But here's the quick way around this if you have a gypsy - when you pick your image, also pick ALL the layers which are all using the same button, just click the feature buttons to choose them (don't forget to shift for other layers that go with that image, too!).  Then when you go back to your mat, select the size of your image and all of the corresponding layers will automatically (if they are grouped) adjust.  Then separate the images to different parts of your mat.

Now arrange your different color papers to match where you want to cut those colors, like this...


So with one push of a button, I cut all of my layers for my image at the same time.  
Now some of these pieces are really little so my favorite thing to use to put it all together in a snap is my little Xyron, making all the little pieces stickers is just the way to go!


Now, I also embossed my card with my Cuttlebug.  I love this embossing folder (just don't ask me the name, because I have no clue - I throw away the packaging!), but you can see it below...


But I didn't want to leave it plain white, I wanted to give it some color, but subtly, so I chalked it with Pebbles shimmery chalks.  This is a great technique because if you mess up, you can simply use an eraser to fix any mistake.  


Finally, I stamped the doll face with one of my Peachy Keen Basic Faces stamp and added the hair and cheek color myself with markers.  I stamped the sentiment (a $1 Michael's stamp I've had in my stash forever), popped the baby girl in carriage embellishment and voila!


I find buying cards so expensive, I'd rather make them. But I'm not really a card maker.  I especially have trouble giving them away after I make them.  I get very selective, like "will the person I'm giving this to really appreciate the work and effort that I put into this card", so a lot of times I end up not using my cards unless I know for a fact a person is going to treasure it (and not just toss it like just another card). Anyone else out there feel the same?
But I know my friend will love it, so this one definitely has a specific purpose for me! 

I hope you enjoyed my little tutorial tonight!  Let me know in the comments below.  Maybe I will do more of these if I see there's an interest!  

Thanks for stopping by!

My Pumpkin - Halloween Layout

Hello everyone.  Thank you to all those who left comments and emailed me their condolences.  It means a lot.  Yesterday I visited Stuck On U Sketches and I came across one of their sketches and I was inspired to create.  My kiddos love to make Halloween crafts and for the last couple years we create different things during this time of year.  I'm not big about carving pumpkins and my kids are too young, so I've found the best alternative - crafting pumpkins!!  Two years ago we created all the pieces and then last year I found these pieces, like "Mr. Potato Head" parts to use for pumpkins and MJ had a blast putting different silly faces on the pumpkin.  I've been meaning to scrap these pictures and I figured I could flip the sketch and make it work.


Here is the original sketch:

My title is from Mini Monsters...


After working on it, I realized I needed to write the story behind the photos, but I didn't want to take away from the page I had already created, so I decided to hide my journaling by adding an interactive element.  So the eye that peeks out from the picture is actually a pull out tab.  
Pull the eye and.....Ta-da!

  One of the blogs I follow, Chloe & Her Clip on Koalas, had a super great layout that opened up completely to reveal all the pictures - it was great!  You can check it out HERE.  So I used her technique here on this layout which I'm also entering in the Whimsical Wednesday's Challenge "Whimsical Wizards".

Finally, this week's Wacky Wednesday Challenge over at the More Than Favors Blog is a color challenge using the colors black, orange, purple and green which is what I used on this layout.

I'm also linking this up here:
Cooking with Cricut - Anything Goes
You Had me @ Craft - Link Up Party


As always, thanks for stopping by!
Be sure to come back tomorrow for another project!


Sunday, October 9, 2011

In Loving Memory of Abuela

As we laid my Grandma to rest today, I wanted to post this in loving memory of her.  My sisters and I spent yesterday going through tons of family albums, gathering pictures of my grandma's life, in order to create a beautiful collage to place at her funeral which was today.  Although it is sad and difficult to have someone so close pass away, I feel incredibly lucky to have had her around so long and glad that my children at least got to meet their great-grandmother.  She lived to be 102 years old - an incredible feat and almost unheard of, most would say.  She was always vibrant, full of life and energy, with a wonderful heart and she touched so many lives.   Although she's gone from this earth, I know she will always be with us in spirit.  Abuelita, the quiero mucho!


She will be missed.

Saturday, October 8, 2011

Halloween - Pebbles - Too Cute to Spook

Hello everyone.  I have a lot going on that I can't get into right now, but I wanted to do a quick post about this Halloween Layout I made.  Like I said in my previous post, I really love the new DCWV Halloween stack and on the back they had a great page idea that I liked.  So I used it as inspiration and changed it up to work with my photos.  Since my little girl is such a cutie, I knew that I wanted an equally cute paper doll to match, so I created a Pebbles paper doll.  Next to her I added a cute little pumpkin from Doodlecharms with some googlie eyes. My friend Elizabeth had these perfect sticker letters, so I decided to punch some circles (some of different sizes) to create my title.  I also used some cotton to create a web from the title to add the dangling spider.


Here's the cute doll which I created to perfectly match my cutie with an adorable pumpkin and spider overhead...


I doodled on the dress to make it match hers!


A bit closer look at the title...


I'm entering this in the following challenges:
My Craft Spot -  Too Cute to Spook
You Had Me @ Craft...


Oh, and I almost forgot, in looking at the new challenge over at Frosted Designs, I saw that I was chosen as the Winner for their previous "Fussy Cutting" Challenge which I entered my "Meet the Flinstones" layout, so that was a nice bit of much needed good news.  

I hope you enjoyed the layout and please leave a comment - I love to read those!

Thanks for stopping by!


Tuesday, October 4, 2011

Halloween - Meet the Flinstones Layout

Hello everyone!  I hope you enjoyed my Disney Week posts and I'm happy to have a couple new followers.  Today I want to share a layout that I just made and I really love.  I haven't scrapped a lot of my Halloween pictures from the last two years, so I tackled the 2009 pics this week.  I am drawn to Halloween papers and embellishments, I keep buying more, even though I already have a ton.  But I recently bought the new DCDW Halloween stack and I LOVE it!!  This layout features it.  Now, if you know me, or as you can see by my title, I can't be without my pop dots - they are an essential.  One of the things I love to do with really pretty patterned paper when I have two of the same paper is cut the patterns out of one of them and pop it on the other of the same paper to give it some great dimension.  I did this with the entire right side of the layout.  So here is the Modern Stone Age Family....


The title is from Mickey Font.


Here is a better view so you can see the dimension and how most everything is popped!


Here is the double page layout side by side:

I'm entering this in the following challenges:
Frosted Designs - Fussy Cutting (and I sure did on this layout!)
She's a Sassy Lady - Just create!

I also want to let you know that one of my favorite challenge blogs, Whimsical Wednesdays is having a Halloween Blog Hop on October 7th (you can see the badge on the top right of my blog) and I'm excited to see the creative things their team comes up with!  

I have some more Halloween layouts to share this week so be sure to come back soon!
Thanks for stopping by!

Related Posts with Thumbnails