Showing posts with label Baby Steps. Show all posts

Saturday, November 5, 2011

Birds of a Feather Layout

Hello everyone!  Finally got around to finishing this page I've been working on of my two kiddos.  I happen to LOVE this picture of them that I took, (reminds me of a magazine photo) I think it shows beautifully the genuine love my kids have for each other (and I hope they always have this bond).  So I wanted to focus on that for this page.  I had this cute "Love Birds" paper that just worked with the photo.  I cut out one of the cute little birds and the saying "I love you bunches" and I also added a "bunch" of flowers up top.  For the title, I had a little trouble, because "love birds" doesn't really go with them, but I finally settled on "Birds of a Feather".  So here is the final product...take a look...


Here's a close up the title, a mixed font title (my favorite) using Sesame Street Font and Baby Steps. 


I'm entering this into the following challenges:
Fantabulous Cricut - For the Birds

Well I'm scrapping with some friends now, so I hope to have more to share later!
Thanks for stopping by!
Leinad

Tuesday, October 11, 2011

Baby Girl Card - Tutorial w/ Gypsy & Embossing Tip

Hello everyone!  There is a baby card challenge over at Cricut 360 this week that inspired me to create a card, since I have an upcoming baby shower for a friend.  In doing so, I decided to photograph the process and make this a little tutorial, too!  First off, here is the card I created:


 I love my gypsy, for so many reasons (maybe a future post?!), but it really makes things quicker and simpler.  Here, I'll show you...

For my card, I knew that I wanted to use my Baby Steps cartridge (because I LOVE it!).  But the image I wanted to use required at least 6 different colors to make it look the way I wanted.  Someone seeing that, might just abandon that cut right then and there, especially if they're looking to make a quick card.  But here's the quick way around this if you have a gypsy - when you pick your image, also pick ALL the layers which are all using the same button, just click the feature buttons to choose them (don't forget to shift for other layers that go with that image, too!).  Then when you go back to your mat, select the size of your image and all of the corresponding layers will automatically (if they are grouped) adjust.  Then separate the images to different parts of your mat.

Now arrange your different color papers to match where you want to cut those colors, like this...


So with one push of a button, I cut all of my layers for my image at the same time.  
Now some of these pieces are really little so my favorite thing to use to put it all together in a snap is my little Xyron, making all the little pieces stickers is just the way to go!


Now, I also embossed my card with my Cuttlebug.  I love this embossing folder (just don't ask me the name, because I have no clue - I throw away the packaging!), but you can see it below...


But I didn't want to leave it plain white, I wanted to give it some color, but subtly, so I chalked it with Pebbles shimmery chalks.  This is a great technique because if you mess up, you can simply use an eraser to fix any mistake.  


Finally, I stamped the doll face with one of my Peachy Keen Basic Faces stamp and added the hair and cheek color myself with markers.  I stamped the sentiment (a $1 Michael's stamp I've had in my stash forever), popped the baby girl in carriage embellishment and voila!


I find buying cards so expensive, I'd rather make them. But I'm not really a card maker.  I especially have trouble giving them away after I make them.  I get very selective, like "will the person I'm giving this to really appreciate the work and effort that I put into this card", so a lot of times I end up not using my cards unless I know for a fact a person is going to treasure it (and not just toss it like just another card). Anyone else out there feel the same?
But I know my friend will love it, so this one definitely has a specific purpose for me! 

I hope you enjoyed my little tutorial tonight!  Let me know in the comments below.  Maybe I will do more of these if I see there's an interest!  

Thanks for stopping by!

Wednesday, August 3, 2011

Cruise Layout

Hello everyone!  I hope you enjoyed my "Aquaholics" layout as Guest Designer for Whimsical Wednesday!  If you didn't get a chance to see it, just keep scrolling after this post or click on "Older posts" and you should come across it!  I know I promised some more funny pictures on today's post, but you will have to wait till tomorrow because I just finished creating another layout that I wanted to enter into two challenges, one over at Cricut 360 for their "Transportation Challenge" and another at Frosted Designs for their "Circle" challenge.  In thinking about what to create, I decided to make the opening page for my upcoming cruise this coming week.  I always buy the cruise photo that you take right at the beginning and use it on my opening page, so now the layout is ready and waiting for the picture. I can't wait!  Here is the layout...


I used a bunch of different cartridges.  I used Summer Vacation for the "Cruise" and the actual ship.  I colored in the top to look like Carnival Cruise line ship which I will be going on.  The title is from my current favorite - Baby Steps and the anchor is from Going Places.  I love the way it turned out!  Off to enter them in the challenge!  Come back tomorrow for another layout!!

Thanks for stopping by!

Monday, July 25, 2011

Splish Splash Layout for Sketch Challenges

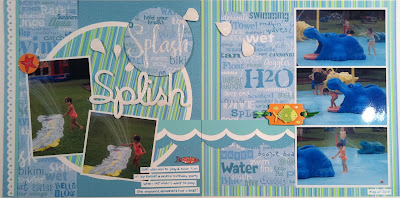
As promised, I have more to share today.  It all started with one sketch that I really liked, so I started looking for pictures that would work for it and then I happened to find more than three, so I combined two other sketches to create the other side of the layout.  I'm really happy with the results and even happier that another memory is now preserved :)  As for the title, I decided to use part of the patterned paper and then combined it with my new favorite font from Baby Steps (which kind of looks just like the patterned paper one).

Here is one of the layouts...


I used glossy accents on the title and the drops that make them look "wet"...


Here are the two sketches that I used for inspiration, this one from Sassy Lil' Sketches...
and this one from Stuck On U Sketches, turned on its side...


This is the other layout which goes with another sketch from Sassy Lil' Sketches...


Here is the combined layout...


I hope you like them!  As always, thanks for stopping by!!
Have a great start to your week!


Wednesday, July 20, 2011

Backyard Campfire Layout

Hello everyone!  I'm back from vacation and ready to do some scrapping!  I really don't do camping, but I love campfires, so a couple days last December, my hubby decided to do a backyard campfire so the kids and I could toast marshmallows.  We a had a ton of fun and I had a bunch of cute pics.  So for the page, I decided of course to use my cricut.  I wanted a mixed title font, which I love and I wanted to have a campfire.  I really like the final result, take a look...

Now, when I make my cuts, I try to do them all at once.  So I set it up that way on my gypsy.  I needed the campfire (from the Camp Out cartridge) to be in both brown and orange, so you'll see I cut it in both colors.  I also needed to make the marshmallow part of the stick white, so I placed it on the gypsy mat so that only the marshmallow part cut out.  See my cut mat below...


The title is from Baby Steps and Pooh Font...

Not sure if you can tell from these pictures, but I added stickles to the fire, which makes it look amazing. I also added this new thing I found called Liquid Enamel, to the marshmallows and they look good enough to eat! 


Thanks for stopping by!  I have a great layout to share with you all tomorrow so come back again, then!

Sunday, July 3, 2011

The Keys Layouts

Hello everyone.  Had some new paper from Best Creations that were inspiring so I browsed my thousands of pictures for vacations that I hadn't scrapped yet and found pics from our Keys trip last year that would work with the papers.  Now the same thing happened to me for both layouts that I'm sharing today.  There was this one really great paper that was easy to work with, just add pics, a title and it was good.  Problem is, I wanted to make them 2 page layouts and then I had to come up with the side page from scratch to coordinate, which is really time consuming.  So they took me a while (much longer than I wanted, but that's how it goes), but I love the end result.  And that's another thing I love about scrapbooking, once you've completed a layout, you have this sense of accomplishment, a memory saved.  I don't know about you all, but I find myself staring at my layouts again and again with a smile on my face.

So let me talk a little about each layout.  First of all, if you know me or follow my blog, you'll know that I like putting a lot of pictures on my layouts (because I take a ton of pictures and like to have them on my pages, but don't necessarily want to create a ton of layouts for the same topic).  So you'll see lots of pictures on each layout.


I like using punches and I especially like the new EK punches (the ones that pack up tight and don't take up a lot of space), which I used to create the top border on the right page of the Keys layout.  Now for the bottom, I had cut a semicircle from the patterned paper, but wanted to add a border to it, so I did using a circle punch and tucking the circles behind the patterned paper to create the scallop paper.  I also ended up adding brads to add more interest, as well.  Now, I try to always journal because telling the story is super important to me, but on this layout, I didn't have much space, so I created the little journal tags and tucked them in.


This second layout was first inspired by the great paper on the left.  I had a focal point photo and tons of others, so I decided to print them small and then I loved the look of this photo block on this paper.  Problem was, I had more photos to add about us on the boat and it took me forever to figure out what to do with the right page.  Of course, now that it's done, its my favorite page, lol!  


 would

I had a scrap of this dot blue paper on my table and it work, but I wasn't sure what I was going to put it on.  I decided to use different shades of blues.  I again went to my punches and created the scallop border for the top and bottom.  The left page has words all over it, so I need words on this page to balance it out.  I decided to create a mixed font title (which I love to do because I love that look). 


 I used a variety of fonts and moved them all of the mat on my gypsy so I could cut out the different colors all at once.  I used Baby Steps (such a cute font, have I mentioned how much I'm loving this cartridge), Mickey Font, Lyrical Letters and Wall Decor & More.   Of course, it's all stickled and "Boat" is popped!


At this point, it was coming together, but I needed something at the top.  So I took a cue from the postcard signage and writing on the patterned paper on the left and decided to create it myself on this page.  I punched circles in a bunch of sizes and dusted off these circle stamps I own that I haven't used in forever.  I created the postcard/mail processed lines with my flexi ruler, a pen and stickles.  


Wow, that was a long post, whew!  Sorry, just decided to let you in on my process (and like I said, with these layouts, it was a long one!).  I hope you've enjoyed the layouts.  As always, Thanks for stopping by!

Friday, July 1, 2011

Another baby layout

In my effort to fill in the blanks of my daughter's first year album (volume 2), here is another layout for her album (only a couple more to go!!).   These are some pics I have of her during her crawling days...oh how quickly the time goes.  I'm getting a lot of use of my new Baby Steps cartridge, gotta love that (cartridge purchase justification!)!  The  images are so adorable and easy to piece!!  Here is the layout with some close ups (sorry for the last pic being sideways, didn't get a chance to rotate it)...


I'm trying to stay on a roll and so far its working!
Thanks for stopping by!

Wednesday, June 29, 2011

Baby Girl Layouts

Hello everyone!  Today I had my new scrap friends over again to scrapbook at my house and they are certainly hooked!  I love it because its so much fun to scrap with other people and now I get to do more scrapbooking, too!   Today I decided to grab my little girl's first year scrapbooks (I have two volumes, hehe!) and create pages to fill in a couple of the empty spots in the albums.  The first layout is of her at 3 months with her great grandmother when she turned 100 (and she is currently 102!).  The other layout I love because I got to use my new Baby Steps cartridge.  I loved the baby sleeping on the cloud with the moon in the background and it worked perfectly for these two pictures of her sleeping that I had to scrap.  
So here are the layouts...


Here is the super cute cutout.  Now, in the book it has more layers in brown and light brown, but I sometimes hate cutting out excess paper for such tiny pieces, so I created the same look with a brown marker (creating the hair and face).

My title is of course stickled!


Hope you like them!  Thanks for stopping by!

Related Posts with Thumbnails