Saturday, July 30, 2011

Little Princess/You & Me Layouts

Hello all!  I'm in the process of filling in the empty pages of my daughter's 1st year - volume 2 scrapbook.  I'm excited because I'm 4 double page layouts away from completing it!  Hopefully I can finish in the next 2 weeks.  Today I have two layouts to share.  First one is from a cute paper line I had found in Michael's.  I used pictures of her when she turned one.  The heart is my favorite cut from the doodlecharms cartridge.   Here is the layout...


This other layout is a scraplift of a layout I had saved in my layouts I love folder that I was able to recreate quickly when I found the same papers.  I wanted a picture of me and my sweet girl which I added today, take a look...


Thanks for stopping by!  I have more to share tomorrow, so be sure to stop by!

Born to Shop Layout

Hello everyone!  My layout today is an older layout that I recently added the picture for (I have a huge box of layouts I've made that I still need to add pictures to so I'm going to try to put a dent in that in the next couple weeks) and its a layout to document one of my favorite pastimes - shopping!  The little tags are about all my favorites.  My favorite thing about the layout is how I created the title (from a sticker set) into a little shopping bag and added tags from different stores that I like to shop at.  When I originally did the journaling for this I had 89 pairs of shoes - but I think that number is a little different now! LOL!  The bottom title says "SALE my favorite word".


Thanks for stopping by!

Monday, July 25, 2011

Splish Splash Layout for Sketch Challenges

As promised, I have more to share today.  It all started with one sketch that I really liked, so I started looking for pictures that would work for it and then I happened to find more than three, so I combined two other sketches to create the other side of the layout.  I'm really happy with the results and even happier that another memory is now preserved :)  As for the title, I decided to use part of the patterned paper and then combined it with my new favorite font from Baby Steps (which kind of looks just like the patterned paper one).

Here is one of the layouts...


I used glossy accents on the title and the drops that make them look "wet"...


Here are the two sketches that I used for inspiration, this one from Sassy Lil' Sketches...
and this one from Stuck On U Sketches, turned on its side...


This is the other layout which goes with another sketch from Sassy Lil' Sketches...


Here is the combined layout...


I hope you like them!  As always, thanks for stopping by!!
Have a great start to your week!


Saturday, July 23, 2011

Family Layouts for Sketch Challenge

Sometimes sketches are the way to go when you want to get started on a scrapbook page.  I have a couple blogs that I use for inspiration as well as a large folder on my desktop where I've put lots of great sketches I've found that I like.  Recently, I came across another new blog called Sassy Lil' Sketches that had some very inspiring sketches and this particular one caught my attention.  I love that you have the whole month to submit them and they give a new sketch every 7th, 14th and 21st of the month.  I found this paper at JoAnns this week that I've seen in a kit before and it always caught my eye, but this was the first time I saw the paper by itself so I bought it and thought it worked great with this sketch.  I had two great pics from my mom's birthday this year and it came together nicely, take a look...


This is the sketch:

Also this week at Sketches in Thyme, they have an open sketch challenge that I'm also linking this up to.

Since I had left over paper, I decided to make another page rather than store it away (and who knows when I'd come across it again).  I added pics from this past Thanksgiving that I hadn't scrapped yet of our traditional family pictures.  Here is the final product...


I've been working on another layout from more sketches at Sassy Lil' Sketches, but you'll have to check back tomorrow to see it!
Thanks for stopping by today!

Thursday, July 21, 2011

BFF Layout from Scraps!

So on that new blog I found, Whimsical Wednesdays, they are having a "Using Your Scraps" challenge...how perfect for me!!  One of the things I hate after I finish a layout are having to put away the scraps that stay on my table, especially the extra stickers and patterned paper elements, because I know I probably won't ever use them again.  So I'd rather do something with them than put them away.  Unfortunately, sometimes I want to get to something completely different and then the pile just stays on my table and then the piles start to build (just ask my sister, she'll tell you, lol!).  So when I saw this challenge, I thought "perfect, now I'll clear out this pile!", so I got started, not knowing what the heck I was going to make this layout about.  I started putting the scraps of paper together to build a 12x12 page and then it took off from there.  The leftover elements I had are from an old Bo Bunny line and I had BFF stickers which led to the formation of the page.


Here is the pile of scraps I started with...


After I was done (by the way, I made the layout in like 30 minutes - I was so excited to finish a page that quick!), I started looking at my computer for the pics to put on and found two great ones of my best friend and I, one on her birthday and one from mine last year.   Here's the layout with pictures...


Finally, I still had a couple more scraps and I made this card to get rid of some more (the black and white polka dot paper is just a paper that I took the photo on top of, not on the actual card)...

So I'll be entering this in the Whimsical Wednesday scraps challenge.

Today I started attacking a monumental task - putting layouts in albums.  I have over 200 layouts that are not in an album yet, so today I started preliminary sorting.  I'm still trying to figure out how I want to arrange them, so this will be an ongoing task.  Considering that this has been on my to do list for over a year and a half, the fact that I started is a big step!  So I separated the layouts in three piles, MJ, Sofi and Family.  Now I have to go through the Family ones (over 100) and decide if I'm going to put them by themes like summer, holidays, general, etc. or if to put them chronologically.  I'd love to know how some of you out there organize your family scrapbooks to get some ideas so feel free to share in the comments below!

Thanks for stopping by!

OPA! Fun Layout

Hello everyone!  I have a fun layout to share with you all.  Last year, we had this super fun night at a new club called "OPA!"and I had a ton of great pictures.  I wanted the layout to be girly and fun and I wanted to put a ton of pictures - I put 11 pictures on this layout!!

I knew that I wanted to use this great cut from Rock Princess cartridge, "Rowdy" with the girls dancing and rocking out.  So it sort of became the inspiration for the layout.  Now, to kinda match the font used in the rowdy cut, I used Storybook for the "OPA!" title.  The swirls are from Rock Princess, too.  I also cut "dance" using Wall Decor & more.

I had one more problem to deal with, I wanted to journal all about the night, but I didn't really have any space and I didn't want to clutter the look of the layout, so I decided to create an interactive element by creating a little flap where I placed the circle photo, added bling around it and the word "fun times" to use to pull open and read the story inside.


I also came across a new blog that I really like called "Whimsical Wednesdays" and they have challenges each week.   I'm entering this layout into their "Interactive Fun" challenge. 

Come back tomorrow for yet another layout!  I'm on a roll!
Have a great day everybody!
Thanks for stopping by!

Wednesday, July 20, 2011

Backyard Campfire Layout

Hello everyone!  I'm back from vacation and ready to do some scrapping!  I really don't do camping, but I love campfires, so a couple days last December, my hubby decided to do a backyard campfire so the kids and I could toast marshmallows.  We a had a ton of fun and I had a bunch of cute pics.  So for the page, I decided of course to use my cricut.  I wanted a mixed title font, which I love and I wanted to have a campfire.  I really like the final result, take a look...

Now, when I make my cuts, I try to do them all at once.  So I set it up that way on my gypsy.  I needed the campfire (from the Camp Out cartridge) to be in both brown and orange, so you'll see I cut it in both colors.  I also needed to make the marshmallow part of the stick white, so I placed it on the gypsy mat so that only the marshmallow part cut out.  See my cut mat below...


The title is from Baby Steps and Pooh Font...

Not sure if you can tell from these pictures, but I added stickles to the fire, which makes it look amazing. I also added this new thing I found called Liquid Enamel, to the marshmallows and they look good enough to eat! 


Thanks for stopping by!  I have a great layout to share with you all tomorrow so come back again, then!

Friday, July 8, 2011

Baby Onesie Framed Layout

Currently I'm out of town on vacation, but with the weather being horrible all day, it gave me a perfect opportunity to do some scrapbooking.  It was really hard to only pack up a few things to take with me to scrap, but I just brought an expand-a-file filled with some papers (some are old and I didn't even remember I had them, lol!) and some letter stickers and a box of tools with a couple punches and some embellishments.  So today I had to make due with what I had and without my cricut (which is really odd for me).  I did bring my gypsy, so if I feel inclined, I can create something on my gypsy and simply cut and add it on when I get home again.

As for today, I had seen this done before of a baby's first items scrapbooked into a frame and I've wanted to do it ever since.  I've been wanting to create this layout for a while now of my daughter's 1st onesie which is embroidered with "I love my big brother MJ"to put up in her room.  Tonight, I took out the papers I had picked out long ago and the onesie and created this...


If I was at home I would have added some flowers, but I don't have them with me, so I had to create my own little embellishment with some punches.  I can't wait to put it in a frame and hang it up on her wall!  Thanks for stopping by!

Monday, July 4, 2011

One more Keys Layout

Just a quick post today.  These are the last of the pics from our Keys Vacation last year that I wanted to scrap before we leave again for this year's trip.  I was able to put 19 pictures in this layout!  Gotta love those collages!  Here is the layout...


Hope everyone has a great 4th of July!!
Thanks for stopping by!

Sunday, July 3, 2011

The Keys Layouts

Hello everyone.  Had some new paper from Best Creations that were inspiring so I browsed my thousands of pictures for vacations that I hadn't scrapped yet and found pics from our Keys trip last year that would work with the papers.  Now the same thing happened to me for both layouts that I'm sharing today.  There was this one really great paper that was easy to work with, just add pics, a title and it was good.  Problem is, I wanted to make them 2 page layouts and then I had to come up with the side page from scratch to coordinate, which is really time consuming.  So they took me a while (much longer than I wanted, but that's how it goes), but I love the end result.  And that's another thing I love about scrapbooking, once you've completed a layout, you have this sense of accomplishment, a memory saved.  I don't know about you all, but I find myself staring at my layouts again and again with a smile on my face.

So let me talk a little about each layout.  First of all, if you know me or follow my blog, you'll know that I like putting a lot of pictures on my layouts (because I take a ton of pictures and like to have them on my pages, but don't necessarily want to create a ton of layouts for the same topic).  So you'll see lots of pictures on each layout.


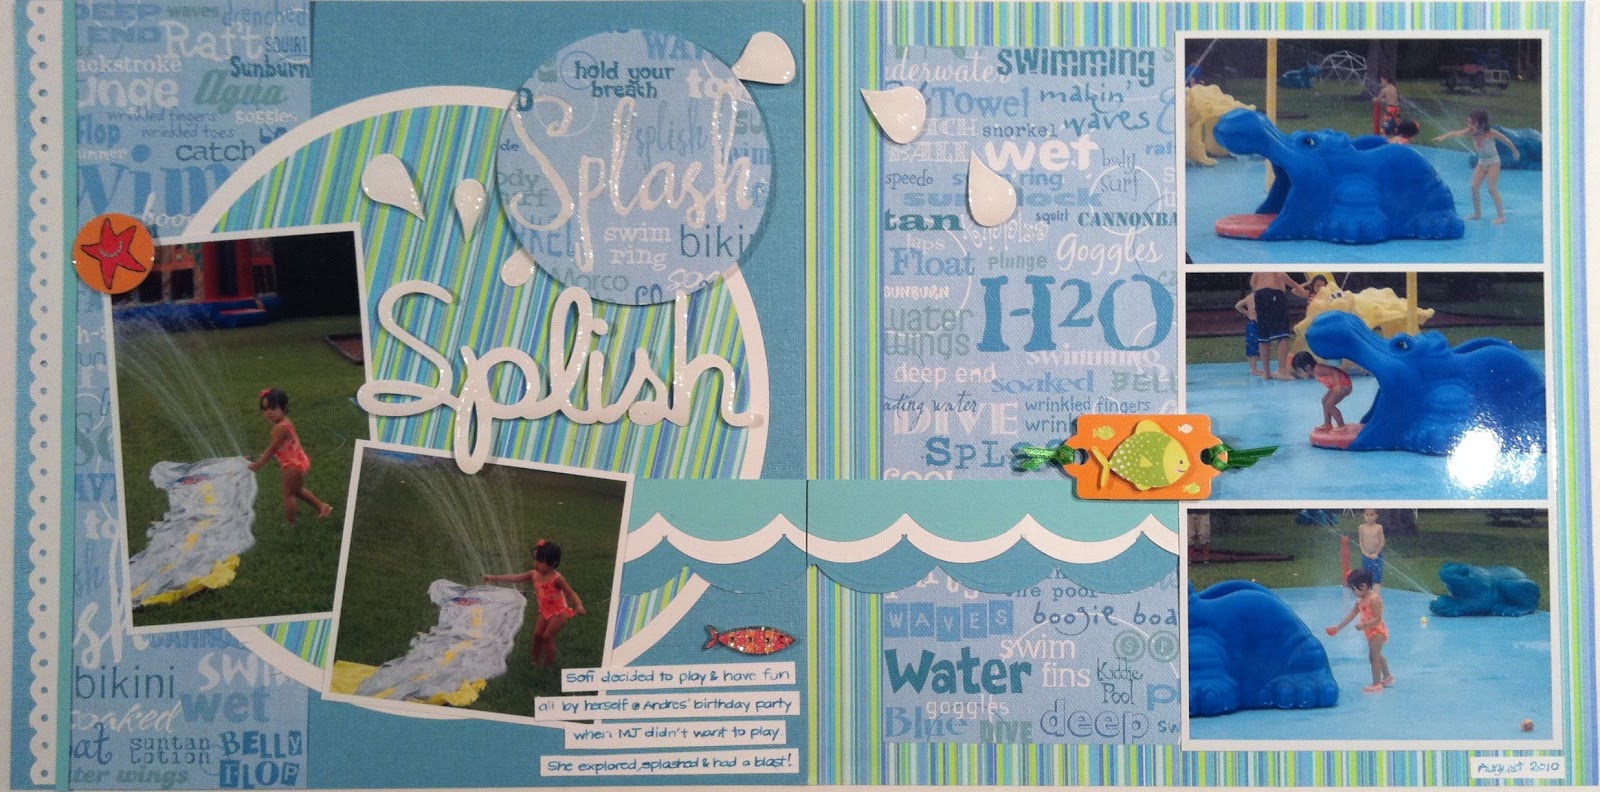
I like using punches and I especially like the new EK punches (the ones that pack up tight and don't take up a lot of space), which I used to create the top border on the right page of the Keys layout.  Now for the bottom, I had cut a semicircle from the patterned paper, but wanted to add a border to it, so I did using a circle punch and tucking the circles behind the patterned paper to create the scallop paper.  I also ended up adding brads to add more interest, as well.  Now, I try to always journal because telling the story is super important to me, but on this layout, I didn't have much space, so I created the little journal tags and tucked them in.


This second layout was first inspired by the great paper on the left.  I had a focal point photo and tons of others, so I decided to print them small and then I loved the look of this photo block on this paper.  Problem was, I had more photos to add about us on the boat and it took me forever to figure out what to do with the right page.  Of course, now that it's done, its my favorite page, lol!  


 would

I had a scrap of this dot blue paper on my table and it work, but I wasn't sure what I was going to put it on.  I decided to use different shades of blues.  I again went to my punches and created the scallop border for the top and bottom.  The left page has words all over it, so I need words on this page to balance it out.  I decided to create a mixed font title (which I love to do because I love that look). 


 I used a variety of fonts and moved them all of the mat on my gypsy so I could cut out the different colors all at once.  I used Baby Steps (such a cute font, have I mentioned how much I'm loving this cartridge), Mickey Font, Lyrical Letters and Wall Decor & More.   Of course, it's all stickled and "Boat" is popped!


At this point, it was coming together, but I needed something at the top.  So I took a cue from the postcard signage and writing on the patterned paper on the left and decided to create it myself on this page.  I punched circles in a bunch of sizes and dusted off these circle stamps I own that I haven't used in forever.  I created the postcard/mail processed lines with my flexi ruler, a pen and stickles.  


Wow, that was a long post, whew!  Sorry, just decided to let you in on my process (and like I said, with these layouts, it was a long one!).  I hope you've enjoyed the layouts.  As always, Thanks for stopping by!

Related Posts with Thumbnails