Wednesday, June 29, 2011

Baby Girl Layouts

Hello everyone!  Today I had my new scrap friends over again to scrapbook at my house and they are certainly hooked!  I love it because its so much fun to scrap with other people and now I get to do more scrapbooking, too!   Today I decided to grab my little girl's first year scrapbooks (I have two volumes, hehe!) and create pages to fill in a couple of the empty spots in the albums.  The first layout is of her at 3 months with her great grandmother when she turned 100 (and she is currently 102!).  The other layout I love because I got to use my new Baby Steps cartridge.  I loved the baby sleeping on the cloud with the moon in the background and it worked perfectly for these two pictures of her sleeping that I had to scrap.  
So here are the layouts...


Here is the super cute cutout.  Now, in the book it has more layers in brown and light brown, but I sometimes hate cutting out excess paper for such tiny pieces, so I created the same look with a brown marker (creating the hair and face).

My title is of course stickled!


Hope you like them!  Thanks for stopping by!

Monday, June 27, 2011

Life is Good Layout

Hello my cyber friends, so glad you've stopped by!  Ever stare at your scrapbook stuff and wonder where to begin or what you're going to work on?  It happens to me and I find the getting started part sometimes the most difficult (and time consuming) part.  Now, as many of you know, I have a lot of stuff and I have this new goal to use more of it before I keep buying more (even though, that part is so much fun, lol!).  So I grabbed one of my many stacks and picked out some paper, but that wasn't really working for me.  So I dug a little deeper and found this whole line of "Life is Good" from Echo Park that I had never touched and decided to do something with it (not even sure of what pictures would eventually go on it).  Of course, the juices started flowing in the wee hours of the night, or some of you might call it the morning (when I seem to do my best work).  As I was building the layout, I figured the story I wanted to tell, from a recent mini vacation that we took and as I found those pictures, they worked perfectly with the layout and the title "Life is Good".  I used the entire right side border (you can barely see it in the picture, but its the whole pink border on the right) to journal and document my story (one of my favorite parts of scrapbooking).  For me, the fact that the memory is now recorded and scrapped gives me a tremendous sense of accomplishment, a way to make it last.  So now, I just look at the layout and smile.  I hope you do, too!  Here it is...


Thanks for stopping by!  Hope you have a great start of your week!

Saturday, June 25, 2011

Pinky Princess Layouts and New Scrap Friends!


I'm finally able to post, hooray!  My computer is unable to upload any more pictures (memory full - needs to be fixed!!) and post anything to my blog :( so I needed to find a way to get the pictures from my phone to my blog and I was finally able to do it (thank you Picasa Web Albums!!).  This week I introduced some friends from work to the world of scrapbooking - I love doing that!  Since they hadn't really ever scrapped before, I decided to prepare a little coordinated set for each to get them started.  I made little containers using Tags, Bags, Boxes & More and in them I put some ribbon, buttons, bling and pop dots.  I then put a couple sheets of cardstock and patterned paper under that matched what was in the containers.  They came into my scrapbook suite and were in awe (it does kinda look like a store, lol!) and after scrapping with lots of my toys, they were hooked!!!  Check them out below, with completed pages and all!  I'm so proud!


As for me, in my cleaning and reorganizing of my room, I came across this old, precut diecut sheet (the kind that you punch out of a page) that were super cute and girly, so I decided to make something with them.  I added pictures of my little Sofi playing dress up.  The picture on the left is her dressed up as a princess the day of the Royal Wedding (its on the TV in the background) because while we were watching it together, she wanted to be a princess, too!


After I'm done scrapping a page, I have all of these leftovers and the thought of having to find a place for them is a little dreadful for me, so a lot of times, I try to create a quick page or card with the leftovers, instead.  The page below is the outcome of just that.  At night, after the kiddos went to bed, I had these few diecuts leftover and decided to create a page with them.  I wanted a premade title, so I went to Once Upon a Princess and found a great one for the page and then scrolled through my pictures for ones I hadn't scrapped that worked with the page and found the perfect ones (they even highlight her butterfly bow, matching the page, lol!). This is what the final layout looks like...


So, as always, thanks for stopping by!
Be sure to leave a comment and let me know you were here!
Have a great weekend!

Tuesday, June 21, 2011

Piano Layout

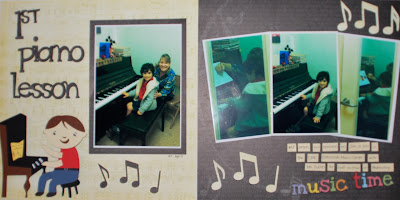
Hello everyone!  I'm so proud of myself - I have been organizing my scrapbooking room and it is looking fantastic - kinda like when I first created the room!  I'll try to post some pictures of it this week so some of you can see it.  Today, I have a cute layout of my little boy to share.  I had some pics of my boy's first piano lesson and I had an itch to use the Playtime cartridge and they went hand in hand.  I designed the little boy on the piano to look like my son (especially the clothes).  The title is from Cuttin' Up.  

**QUICK TIP to share for gypsy users:
If you're like me and you forget which cartridges you used on certain layouts, you can go into your file on the gypsy, click on the keyboard, click on the cartridge name at the bottom.  This will take you to the cartridge menu, at the top where it says SHOW, click and choose Cartridges in Use, and it will list all the cartridges you used on that file.  This should help narrow down what you used!


Now back to our regular scheduled programming...here is the layout:


Here is the closeup of the title and boy on the piano...


I hope you like it!  Thanks for stopping by!

Sunday, June 19, 2011

Camel Ride Layout

I have a layout that I'm excited to share.  I had sketched this on my gypsy almost a year ago, but I hadn't gotten around to finishing the layout until recently.  The most difficult part for me was finding the right paper to go with these type of pictures.  I finally found it with basic grey, so I finally was able to create the layout.  I wanted a shape to take up most of both pages and I wanted a large camel that was life like.
Here is the completed layout...


The left page close up...

The title is welded using Don Juan...


The right page close up...


To create a realistic camel, I used flocking powder in two tones to create the look to match the actual camel we rode.  I love the way it came out!


Hope you've enjoyed the layout!  I have another to share tomorrow, so be sure to come back and check it out!  
Thanks for stopping by!

Friday, June 17, 2011

Thanks a Latte! & Robot

Thank you to all of you that left comments!  So happy to know that some of you are still following!  Today I was able to do a big clean out of my kids rooms and my scraproom - at least I can see the tables now!!  That is a BIG deal for me!  So I wasn't able to start a layout yet (hoping tomorrow is the day!), but I wanted to keep the ball rolling with my posting, so I wanted to share a card I made and gave to my son's teacher.  It reads "Thanks 'A Latte'" and inside it says, "just wanted to 'espresso' my thanks".  In the front, there is a pocket that holds a starbucks card.  Take a look...


I did get to use a new cartridge today that I bought recently, but hadn't used yet, Robotz.  I bought it to use with my son and I thought it had a super cute font (haven't used it yet, but just wait!).  Tonight, I got to do just that, because he wanted to make a robot, so I linked it up to my gypsy and he picked out the one he wanted to make.  I set it up on the gypsy and then he cut it out and assembled it mostly by himself.  He started playing with it right away, so I laminated it so it could last longer.  I just love how cute it is - he named it "Robot 3000".  Here it is...


Thanks for stopping by, I have a layout to share tomorrow, so I hope you will be back to check it out!

Thursday, June 16, 2011

I'm baaack!!!

It's been months since I last posted and my life has surely been on a roller coaster ride with all sorts of things happening to me - both negative and positive, but through it all, I managed to survive and finish the school year with a bang!  I'm finally on vacation for the summer and I feel like I can finally breathe, so I hope to be back blogging much more often!!

For some highlights of what has been happening to me - I won Social Studies Teacher of the Year for Miami-Dade county which is so very exciting for me.  I also took my cheerleading team to their first competition and they won the first one and placed 2nd against 8 teams in their second competition so it was very exciting.  I was also able to take a group of 20 kids to Washington D.C. on a field trip of a lifetime.  My son also graduated from Pre-K and had his first piano concert, which he did great in!!!  There is so much more that happened in between, but those are just a few things that have kept me very  busy and away from here!

So today, to ease my way back in, I wanted to share a school layout and the teacher gift I made for my son's teacher.  I had an acrylic frame that I decided to scrap.  I found this great dimensional sticker that said "I love my teacher" and it worked perfectly.  I chose three pictures, two with her and him and I added the sticker on top of the frame.  On the back, I wrote her a beautiful card that she could read over and over again, wherever she decides to put the frame.  I put this and other monogramed items as well as a fabric flower pot (which I personalized with #1 Teacher and her name as well as a message from my son) and a gift card in a basket.


I also completed this layout of my son in PreK 4 including him in his classroom, his artwork and wrote about his favorite things this past year.  The buttons on the bottom are made with a great Martha Stewart punch to which I added scrapper's floss.


I'm in the process of organizing my scraproom (again, lol!) and hopefully, I hope to get back into scrapping and sharing my work with you all much more often.  
As always, thanks for stopping by!!
Please let me know you're still reading this thing and leave a comment!
Have a great day!!

Related Posts with Thumbnails