
Welcome to ScrapSticklePop and the fourth Fantabulous Cricut Crawl...Fantabulous Cricut's version of a blog hop! If you're a frequent visitor, thanks for stopping by again today! If you're new here - WELCOME! I hope you like what you see, feel free to browse my other posts, and if you'd like to keep coming back, I hope you become a follower!
Valentine's Day is in a week and everyone at Fantabulous Cricut has decided to Share the Love! Each Design Team member will be featuring an original Valentine-themed project that includes the word LOVE somewhere on it.
If you've come from visiting Kate at Small Bits of Paper, you're in the right place! If you've just happened across my blog and would like to play along with our Fantabulous Cricut Crawl, start HERE.
Make sure to check out each DT member's blog for some awesome inspiration! There will be PRIZES along the way at some of our DT members' blogs, AND there will be a Grand Prize up for grabs at FCCB for one participant that submits a "Share the Love" project at FCCB!
So be sure to join in and share the love, too!
Now onto my project...
Now onto my project...
I'm a die-hard scrapbooker so of course, I created a layout. In thinking of what I was going to make, I wanted to make something really cute and whimsical, so I went to a newer cartridge that I haven't really explored and found the love bugs - that was it, I was in LOVE! So I started designing on my gypsy (don't worry, I'll be showing this to you, too!). I had recently bought these great Fancy Pants papers from A Cherry on Top and thought that it would go perfect with this layout I was creating. My son helped me cut and piece my cute love bugs and title - I love to have my little helper around! I added ribbon to the mats (tip: I adhere the ribbon to the back of my mats so I can slip the picture right in under the ribbon later). Of course, everything is popped (this is ScrapSticklePop, lol!). So take a look...
 Close up of the left page
 Here is the right page

My title, which is shadowed and I added a little bow and googlie eyes...


Cute kissing love bugs. I welded the antennas together and popped the heart. I also did a lot of stitching on all my little embellishments.


Now that I had a basic idea of what I wanted my layout to be, I separated each cut by colors. I love being able to make all my cuts at once, so I used my 12x24 mat to make that happen. It's easy to copy/paste on the gypsy, but many people do not know how to do this, so let me share how to do this:
On layer 1, click the item you want to copy (it will be highlighted in blue). Without clicking on anything else, click on layer 2 and click on the double square in the advanced tab. Voila, it will appear. Now you can move it wherever you want on the mat. So as you can see below, I put everything I wanted to cut together by color: in black on the top left, in red on the top right, in one shade of pink on the bottom left and the other shade of pink on the bottom right.
 In the picture below is what it looked like as I loaded it into my Cricut.
Another tip: when you are using putting your papers on the mat (especially when using a 12x12 mat), be sure that you line up the arrow on your mat just the way it looks on your gypsy so you put the colors in the right places.


My title, which is shadowed and I added a little bow and googlie eyes...

One of my bugs with some hearts cut from my always go to George cartridge

Cute kissing love bugs. I welded the antennas together and popped the heart. I also did a lot of stitching on all my little embellishments.

So now here's how it all began. I used my gypsy to design my layout - its not just for cutting, you know! To plan my photo mats, I use George and make them the size I want my mats to be (under the Basic tab, if you click the link button under the height/width, it will turn to white- its usually yellow - and then you can make your mat 4x6 or any size you wish without one part increasing in proportion to the other).
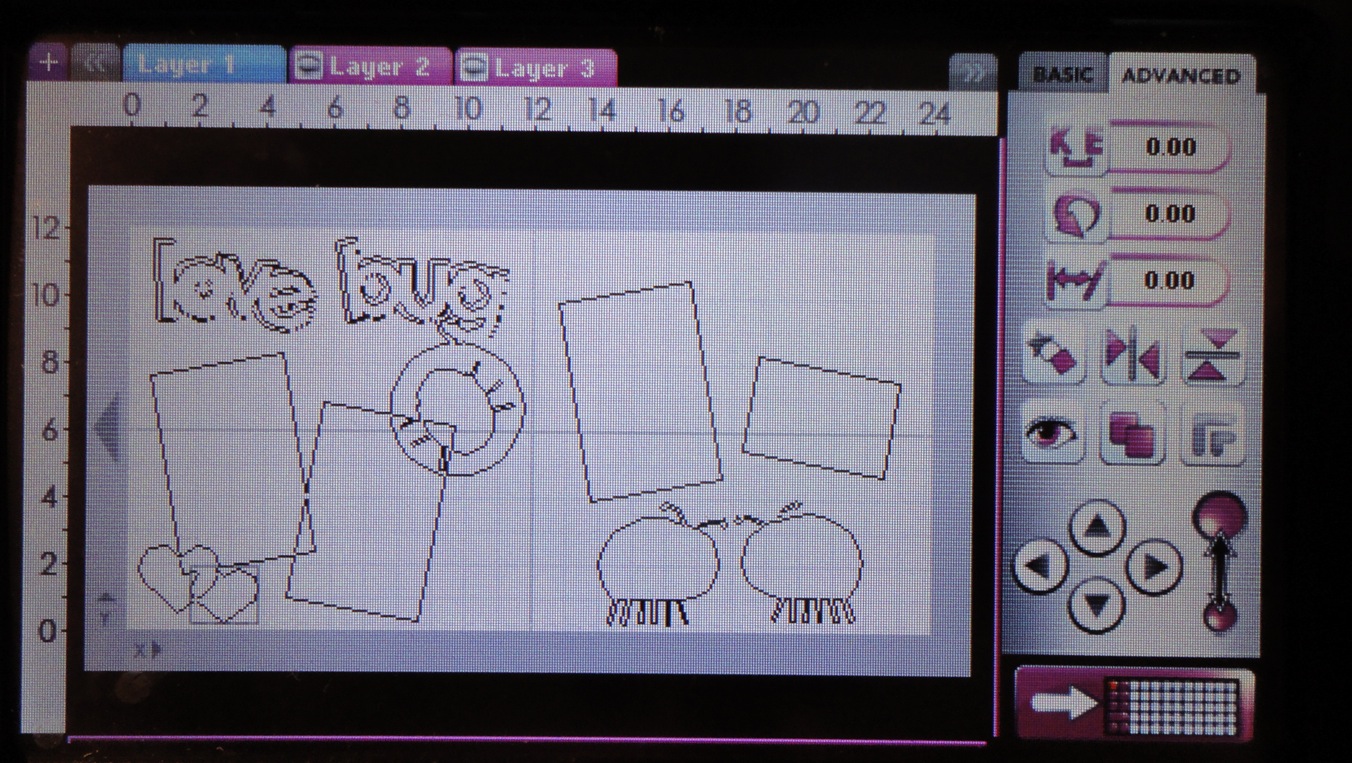
Now that I had a basic idea of what I wanted my layout to be, I separated each cut by colors. I love being able to make all my cuts at once, so I used my 12x24 mat to make that happen. It's easy to copy/paste on the gypsy, but many people do not know how to do this, so let me share how to do this:
On layer 1, click the item you want to copy (it will be highlighted in blue). Without clicking on anything else, click on layer 2 and click on the double square in the advanced tab. Voila, it will appear. Now you can move it wherever you want on the mat. So as you can see below, I put everything I wanted to cut together by color: in black on the top left, in red on the top right, in one shade of pink on the bottom left and the other shade of pink on the bottom right.

Another tip: when you are using putting your papers on the mat (especially when using a 12x12 mat), be sure that you line up the arrow on your mat just the way it looks on your gypsy so you put the colors in the right places.

And in one load and unload of my mat, all the cuts I need for my page are done!
So before you continue "crawling" along to the next blog, I have a little BLOG CANDY for you today! It's just a couple little things that I love - flowers and bling! One of the items is a super cute felt flower clip that you can use on your keys, purse, scrapbook bag, etc. In keeping with the theme, to be eligible to win, become a follower (if you're not already) and leave a comment telling me the 3 Cricut cartridges that you most love!

Next stop...the fantabulous Michelle at Scrappin' with my Bug. Go see her fun creation... And when you're done, make sure to link up your project to FCCB's Fantabulous Cricut Crawl post to be entered into the contest!
Thanks for stopping by, I hope you come back soon!
Happy Crawling!


